|
Trim tabs - Stainless steel suggested
Actuators - Upper hinge material (part #A1103) made of flexible nylon. Remainder of actuator
made of high impact fiberglass filled nylon.
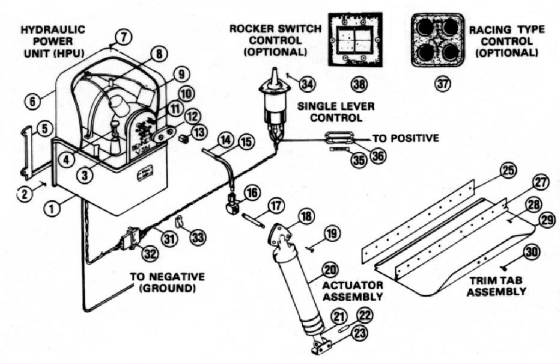
Hydraulic Power Unit (HPU)
- HPU draws a maximum 18 amps (broken-in) and operates on 12
volts DC (except 24 and 32 volt HPUs). Approximately 22 ounces of ANY TYPE AUTOMATIC TRANSMISSION FLUID (ATF) is required
to fill the reservoir to proper level for single actuator installations. With the trim tabs fully retracted, proper
fluid level is about 2" from the bottom of the reservoir.
The HPU forces both trim tabs full-up to full-down
in 9-10 seconds, individually in 4-5 seconds. (Trim tab travel on dual actuator systems takes twice as long.)
Helm Control - Controls on 12 volt systems use 20 amp in-line fuse. (24 and 32 volt use proportionally smaller.)
Hydraulic Tubing - Tubing has 1/4" outside diameter and 1800 lb. burst pressure.
Wire harness - Wire
colors and their functions:
Red wire
Port solenoid valve
Green wire
Starboard solenoid valve
Blue wire
Motor forward (pump pressure)
Yellow wire
Motor reverse (pump retract)
Black on HPU
Ground
Orange on helm control Positive
|
Diagram Number |
Description |
Part
Number |
|
1 |
Fluid reservoir |
VP1139 |
|
2 |
#10 x 1" screw |
H1180 |
|
3 |
Filler Stack |
-------- |
|
4 |
Filler Plug |
VP1140 |
|
5 |
Mounting bracket for HPU |
H1179 |
|
6 |
Lexan cover |
VP1138 |
|
7 |
Type 25 thread cutting screw |
VP1154 |
|
8 |
Motor strap |
VP1142 |
|
9 |
Solenoid valve |
VP1135-R
VP1135-G |
|
10 |
Faceplate for HPU |
VP1144 |
|
11 |
1/8" pipe to 1/4" tube connector |
VP1146 |
|
12 |
Hex retainer |
VP1141 |
|
13 |
Nut with ferrule |
T1127 |
|
14 |
Hydraulic tubing (20' unless otherwise specified) |
H1171 |
|
15 |
Tube bending clip |
H1173 |
|
16 |
Female elbow |
H1172 |
|
17 |
Pipe nipple (3" unless otherwise specified) |
H1171 |
|
18 |
Upper hinge |
A1103 |
|
19 |
#14 x 1-1/2" screw |
H1174 |
|
20 |
Cylinder body |
A1105 |
|
21 |
Piston with o-ring |
A1109 |
|
22 |
Lower hinge pin |
A1115 |
|
23 |
Lower hinge |
A1113 |
|
25 |
Backing plate |
varies with size |
|
27 |
Hinge plate |
varies with size |
|
28 |
#10 x 1-1/4" screw |
EH1071 |
|
29 |
Trim tab only |
varies with size |
|
30 |
1/4-20 x 3/4" machine screw |
H1175 |
|
31 |
Wire harness (22' unless otherwise specified) |
WH1000 |
|
32 |
Quick-disconnect plug |
VP1143 |
|
33 |
Nylon hanger |
H1177 |
|
34 |
Single lever control |
VC1000 |
|
35 |
20 amp fuse (12 volt system) |
H1176 |
|
36 |
Fuse holder |
H1178 |
|
37 |
Racing type control |
RT1000 |
|
38 |
Rocker switch control |
RS1000 |
Trim Tab System Information and Troubleshooting
1. If trim tabs do nothing...no movement...no
sound from HPU -
- Inspect for blown 20
amp in-line fuse in helm control's orange wire.
- Inspect for disconnected or corroded connections on
HPU ground wire, orange positive wire from helm control, and quick disconnect plug.
2. If HPU runs but trim tabs do not move -
- Inspect for disconnected
or corroded red and green valve wire connections at helm control and quick-disconnect plug.
- The following
test can be used to help isolate the malfunction.
|
Remove wires from helm control and touch
together as follows: |
|
Operation |
Reaction |
|
Orange (+), blue, red |
Port trim tab down |
|
Orange (+), blue, green |
Starboard trim tab down |
|
Orange (+), blue, red, green |
Both trim tabs down |
|
Orange (+), yellow, red |
Port trim tab up |
|
Orange (+), yellow, green |
Starboard trim tab up |
|
Orange (+), yellow, red, green |
Both trim tabs up |
- If the tabs function properly in each of the above combinations,
check the helm control. If during this test the trim tabs continue to malfunction, inspect the HPU.
3. If one trim tab operates and the other does not -
- Inspect for disconnected or corroded red or green valve wire connections at helm
control and quick disconnect plug. (Red wire operates port trim tab; green wire operates starboard trim tab.)
- Reverse the hydraulic tubing at front of HPU to determine if malfunction is in HPU or actuator / hydraulic connections.
If ,after reversing lines, the symptom shifts to other trim tab, a malfunction may exist in HPU. If the symptom remains
on the same side, a malfunction may exist with the actuator / hydraulic connections.
4. If trim tabs go down but will not retract -
- Inspect
for low voltage of the batter. Check battery voltage while HPU (or another accessory) is running. If voltage is
less than 10 volts, valves will not open.
- Inspect for disconnected or corroded connections on
helm control and at quick disconnect plug.
Maintenance
- Periodically, check fluid level in HPU.
With trim tabs fully retracted, fluid level should be about 2" from bottom of reservoir (approximately 22 ounces). To
refill, remove the lexan cover and filler plug located on the front left hand corner of the reservoir. FILL WITH ANY
TYPE OF AUTOMATIC TRANSMISSION FLUID (ATF) ONLY. Brands or types of ATF can be mixed. Running the HPU with excess
or lack of fluid will not cause damage.
- Periodically, check for clean electrical connections on the back of the
control, HPU ground wire and quick disconnect plug.
- Cold temperatures do not affect the trim tab system. No winterization
is necessary.
- SALTWATER ONLY - To deter electrolysis, a zinc
anode should be attached to the top of each trim tab. The zinc must make direct contact with the stainless steel.
In the case of trim tabs installed on the boat as original equipment by the builder, a bonding system may be utilized for
your particular model.
- We suggest using anti-fouling paint to help
protect the trim tabs from marine growth. The secret to getting anti-fouling paint to adhere to your trim tabs is proper
priming, and the best people to tell you what to do are the experts at the company that makes your anti-fouling paint.
We strongly suggest that you contact the paint manufacturer and tell them you are painting "304 stainless steel" trim tabs,
then follow their recommendations to the letter! Remember don't paint under the zincs.
- Unpainted trim tabs may acquire an orange discoloration. THIS OXIDATION
OF SURFACE CARBON MOLECULES IS NORMAL. Orange coating
can be cleaned off, but will eventually return. Note: this discoloration should not be confused with the pitting and
corrosion of electrolysis.
How to Use Trim Tabs
GETTING STARTED
The
key to obtaining optimal results from trim tabs is to operate them in short “bursts” and let the boat react before
making another adjustment. The amount of time between corrections is influenced by the size of the trim tabs and the boat’s
speed. This will help avoid overtrimming or ending up with one tab too far down when correcting lateral trim. You will quickly
become acquainted with a boat’s particular traits.
TAKE OFF 
Properly sized trim tabs can significantly reduce the time needed to get up on plane.
They also allow a boat to keep its bow down and stay on plane at lower speeds. As the throttle is advanced the stern of the
boat begins to squat, lifting the bow. As the boat accelerates, push the bow down position of the helm control in short bursts.
The boat reacts by the stern lifting, the bow coming down, speed increasing, and reduced engine laboring. If you over do it
and deflect the tabs too far the boat will end up overtrimmed. When over trimmed, the steering becomes “over sensitive”
and wants to pull off course to port or starboard. If this occurs, operate the control “bow up" until the desired attitude
is established.
CORRECTING A LISTING CONDITION 
As a result of uneven weight distribution, prop torque or wind, a boat runs with
a list. Deep "V" hulls are particularly vulnerable to this condition. Running with a list is uncomfortable, as well as unsafe.
Bennett Trim Tabs operate independently for effective list correction. To correct for list, lower the trim tab on the
side of the boat that you are listing to. This will bring the boat level.
TRIM TABS AND POWER TRIM
It is a common misconception that if a boat has power trim on the outboard or outdrive it does not need
trim tabs. Power trim can be used to adjust the boat's attitude, but it is highly inefficient. A propeller is designed
to force the boat forward. When trimming the boat with the prop, the prop must not only push the boat forward but raise the
stern as well. In this situation, prop slippage is greatly increased thereby wasting R.P.M.'s. Power trim cannot correct listing,
and is ineffective at slower speeds. Bennett Trim Tabs, in combination with power trim, enable both the hull and prop
to be trimmed independently. The trim tabs trim the hull, while the power trim adjusts the prop. The result is optimum performance
and efficiency not attainable by the use of power trim alone.
To acheive maximum performance, first adjust the trim tabs to achieve the desired
running attitude. Next, use the power trim to position the propeller thrust parallel to the water flow. If necessary, re-adjust
the trim tabs to fine tune the attitude. By observing the boat’s speed and engine RPMs the best combination of trim
tabs and power trim will be apparent. Trim tab angle indicators and a power trim angle indicator are particularly useful in
duplicating effective settings.
 
TRIMMING TO SEA CONDITIONS
When running into a head sea you want to trim the bow down so the sharp forward sections of the boat do their
work cleaving the waves. This provides the most comfortable ride and minimizes stress on the boat (and passengers). In a following
sea the tabs should be fully retracted for maximum steering response.
CORRECTION OF PORPOISING
Operate the tabs in very short bursts of about half a second. Continue until porpoising subsides. The objective
is to have only a very slight amount of tab deflection, just the amount needed to cure the up and down motion of the bow.
|
